Overview
HTML (Hypertext Markup Language) is a “mark-up language” used to “mark-up” a text document with tags that tell a web browser how to display the page.
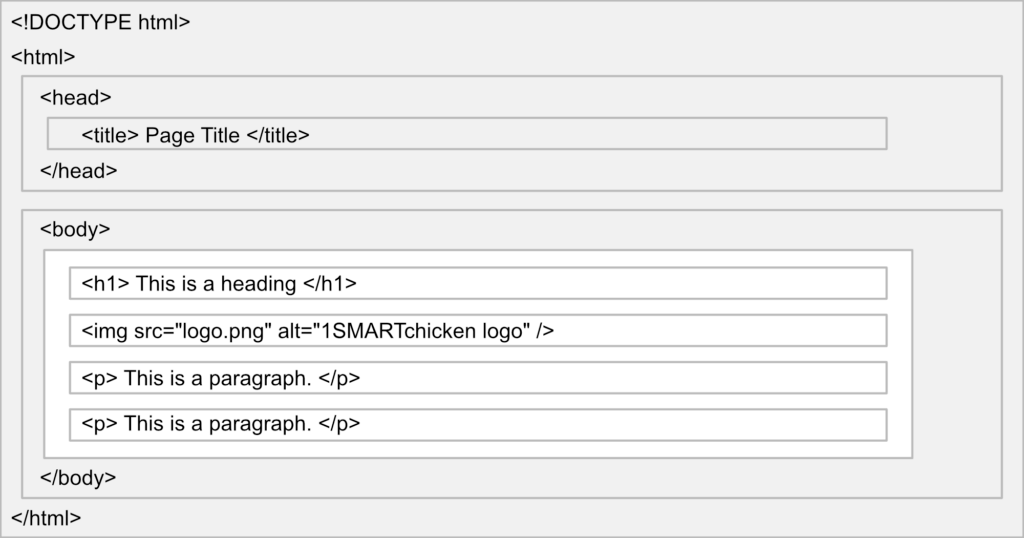
Below is a visualization of an HTML page structure.

Note
The only thing that will show on the page inside the browser is the area in white (minus the tags of course).
This is a simple template containing just the basics to code a page with a page heading, an image, and a couple paragraphs of text.
<!DOCTYPE html>
<html>

<head>
    <title>Page Title</title>
</head>

<body>
    <h1>This is a Heading</h1>
    <img decoding="async" src="logo.png" alt="1SMARTchicken logo" />
    <p>This is a paragraph.</p>
    <p>This is a paragraph.</p>
</body>

</html>
<!DOCTYPE>
Line 1 uses the <!DOCTYPE> tag to describe to the browser what type of document follows.
<!DOCTYPE html>HTML, Head, and Body
Then we have an opening and closing <html> tag which will contain the <head> and <body> of the page.
The <head> will contain items the browser uses but does NOT display on the page, such as the page title which usually appears in the browser tab.
The <body> contains everything you will see on the page. Occasionally the <body> will also contain things not shown on the page such as some JavaScript, coding comments, and other things used to describe the page or page behavior to the browser.
<!DOCTYPE html>
<html>

<head>

</head>

<body>


</body>

</html>
Page Title
For now, all we need in the <head> is our page title. Don’t confuse this with a page title we may place within the <body> of the page. Our page title in the <head> will usually appear in the browser tab.
<!DOCTYPE html>
<html>

<head>
    <title>Page Title</title>
</head>

<body>


</body>

</html>
Contents of the Body Tag
Finally, within the <body> of our document we will place a heading, followed by an image, and then by a paragraph of text.
For our main heading in our simple HTML document, we will use an <h1> tag, which is the most prominent of headings. A page can have multiple headings. They range from <h1> to <h6> with the size typically being largest for the <h1> tag and smallest for the <h6> tag. But this isn’t necessary or important. What is important is that the <h1> tag should only be used once per document page, while all the other header tags can be uses as many times as necessary to split up your document text. It’s also best to use these in logical order with the <h2> through <h6> tags acting as subheadings to the overall <h1> tag. Each page should always have one <h1> heading for SEO purposes.
The <img> tag is used to add an image to the page and only requires a (src) and (alt). The (src) is the location of the image on your server and the (alt) is a simple description of the image.
Finally, the <p> tag is uses to place paragraphs of text. Each paragraph should be wrapped in its own set of <p> tags.
<!DOCTYPE html>
<html>

<head>
    <title>Page Title</title>
</head>

<body>
    <h1>This is a Heading</h1>
    <img decoding="async" src="logo.png" alt="1SMARTchicken logo" />
    <p>This is a paragraph.</p>
    <p>This is a paragraph.</p>
</body>

</html>
Note
This has been an extremely simplistic look at all these HTML elements. You can find much more detailed explanations and samples in other HTML tag tutorials on this site.
HTML Notes:
- In our HTML section the term “tag” and “element” are often used interchangeably to refer to both the tag used to create a page element and the element created by the tag (<p> tag = <p> element = paragraph on the page)
- HTML5 is not case sensitive; so <P> is the same as <p>, <H1> is the same as <h1>
- Global attributes can be used with all HTML tags and are therefore not mentioned on every tag page
- To write clean, readable HTML code, it is best to use indentation whereas elements within elements are indented (tabbed or spaces) to create something that looks like a project outline
- The browser will automatically remove any extra spaces and lines in your HTML code when the page is displayed
- Double quotes or single quotes can be used around HTML attribute values, but when the attribute value itself contains one form of quote, it will be necessary to use the other around the attribute
We’d like to acknowledge that we learned a great deal of our coding from W3Schools and TutorialsPoint, borrowing heavily from their teaching process and excellent code examples. We highly recommend both sites to deepen your experience, and further your coding journey. We’re just hitting the basics here at 1SMARTchicken.
